Webflow LCP Optimization Techniques
Written by
Andy Dao
,CEO
Published on:
September 8, 2025

Why Webflow LCP Optimization Matters
Core web vitals have redefined how Google ranks websites. In 2025, Largest Contentful Paint (LCP) isn’t just another stat—it’s a top-tier ranking factor impacting your SaaS brand’s acquisition, UX, and bottom line.
Here’s the pain point for SaaS teams: Even visually polished Webflow sites often show slow LCP warnings in PageSpeed Insights, quietly burning organic reach and conversions. LCP issues are especially common for landing pages loaded with onboarding banners, hero images, and dynamic content—typical for SaaS marketers seeking engagement.
LCP measures how quickly your site’s most significant element renders and is visible to users. In practice, it looks at the load time for hero images, headlines, or banners “above the fold.” Google uses this metric because it’s a reliable proxy for when users feel a page is useful. Slow LCP? Expect higher bounce rates, reduced time on site, and lost MRR.

Hero visual: fast-loading Webflow landing page with prominent hero image and an LCP meter showing an optimal score — emphasizes why LCP matters for SaaS SEO.
- LCP under 2.5s = green zone.
- SaaS landing pages are extra prone to poor LCP.
- Google rewards fast LCP with higher SEO rankings and better UX.
What Impacts LCP in Webflow?

Common Webflow LCP blockers visualized: oversized hero images, early-loaded third-party scripts, improper lazy-loading, and large embedded videos that delay the largest contentful paint.
LCP pinpoints the loading speed of your page’s largest visible content block. In Webflow, this is typically:
- Hero images or background visuals
- Main banners or promotional graphics
- Prominent H1/H2 text above-the-fold
- Large embedded videos
SaaS marketers often prioritize striking visuals and branded content in Webflow. But these elements can seriously bloat LCP if not optimized.
Frequent Webflow-Specific LCP Blockers
- Unoptimized image assets: Uploading full-resolution hero images (2MB+) instead of WebP or resized files.
- Poor lazy loading settings: Overusing lazy loading on critical above-the-fold content. (Ironically, putting
loading="lazy"on your hero image will delay the most important paint!) - Non-critical script bloat: Embedding customer chat, analytics, or tracking scripts early in the DOM, creating render-blocking resources.
- Excessive custom code: Injecting custom HTML or JavaScript in the
<head>or before the main content, stalling critical rendering.
Step 1: Audit Your Current LCP Performance
You can’t improve LCP in Webflow if you don’t know your baseline. Let’s quickly pinpoint what’s dragging your page speed down, using battle-tested, Google-approved tools.
Recommended LCP Audit Tools
- Google PageSpeed Insights (pagespeed.web.dev): The gold standard for scoring real-world LCP and identifying what’s actually being measured.
- Webflow Audit Panel: Native, browser-based audits to highlight image sizing, unused code, and visual load order inside the Designer.
- Chrome DevTools: Open DevTools (
F12) > Performance Panel > Record. Highlight LCP paint timings and see exactly which resource triggers the metric.
How to Quickly Check LCP in Webflow:
- PageSpeed Insights: Paste your live Webflow URL, scroll to the “Largest Contentful Paint element” in the diagnostic. Note the exact DOM node (image, text, etc.) and the time.
- Webflow Audit Panel: Inside the Designer, open the Audit Panel and review flagged “Image file sizes” and “Unused images.” The panel points out heavy above-the-fold assets.
- Chrome DevTools: Run a Performance recording as a real user would load your key landing page. Hover over the purple LCP line to confirm which element is measured and when it paints.
| Tool | How to Use for LCP | Insight Type |
|---|---|---|
| PageSpeed Insights | Analyze public URL, check “Largest Contentful Paint element” node | Field + Lab Data |
| Webflow Audit Panel | Flag oversized images, check recommendations inside Designer | Design Asset Warnings |
| Chrome DevTools | Record load, find the LCP paint stamp & DOM reference | Precise Resource Timings |
Step 2: Optimize Above-the-Fold Images
Almost every slow LCP in Webflow starts with a bloated hero image. SaaS sites love big banners, but unoptimized graphics crush performance at the moment that matters most.
5 Image Actions That Instantly Improve LCP in Webflow
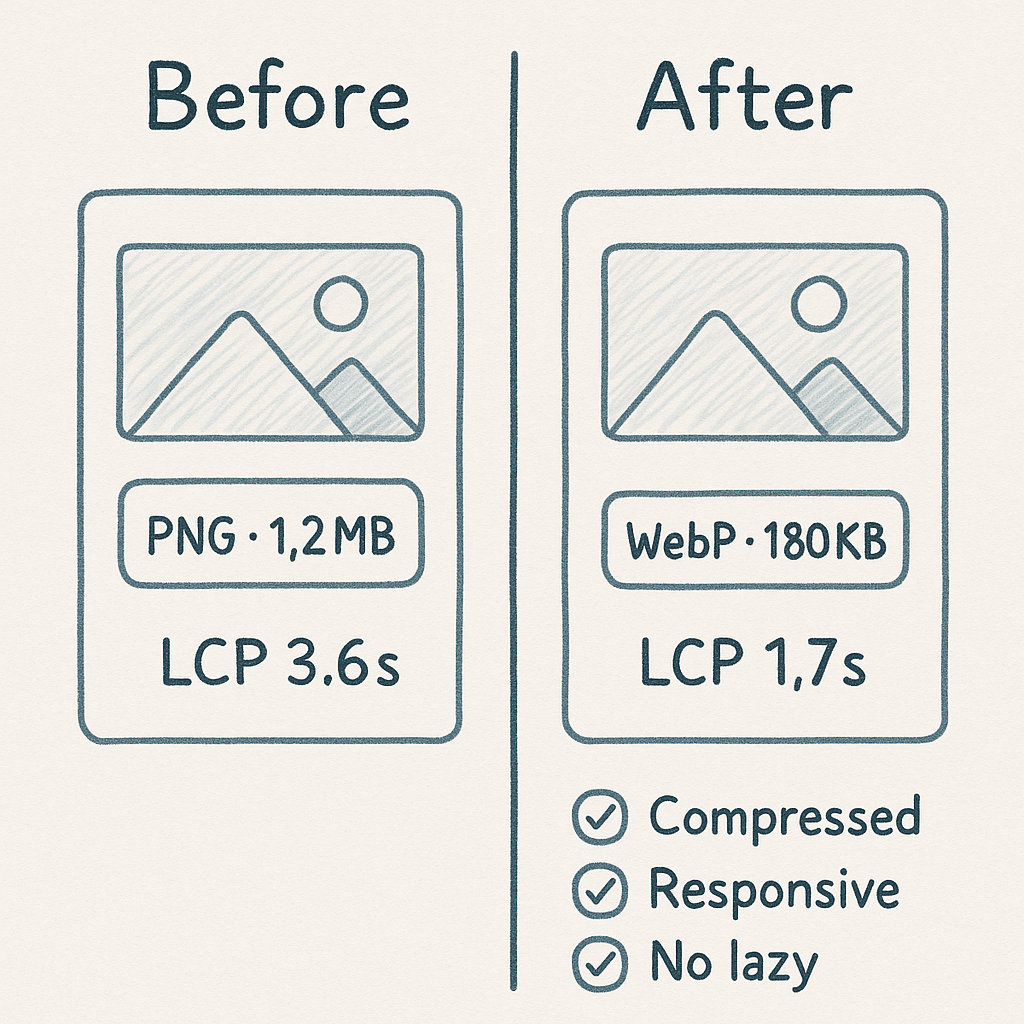
Before vs after image optimization: convert hero from large PNG to compressed WebP/AVIF and enable responsive sizes — demonstrates the direct LCP improvement (e.g., 3.6s to 1.7s).
- Compress hero images: Use tools like Squoosh or TinyPNG to cut file sizes by 60–90% without visual loss.
- Resize for display, not retina: Match image pixel dimensions to CSS container size—avoid uploading a 2400px image for a 1200px display slot.
- Adopt next-gen formats: Use WebP or AVIF rather than PNG or JPEG for instantly smaller and faster-loading files.
- Leverage Webflow’s responsive images: Enable so Webflow automatically generates scaled variants for every screen, reducing data transfer on mobile.
- Avoid lazy loading your LCP element: Only set
loading="lazy"on assets below the fold. The hero image or LCP graphic should load immediately.
Webflow Image Optimization Best Practices
- Before upload: Compress images, export to WebP/AVIF, and crop to display pixel size. No more oversized PNGs.
- In Webflow: Check “Responsive image” toggle in Asset settings.
- Review LCP element: Remove
loading="lazy"from the hero image. Webflow allows manual override on important images. - Publish, then retest LCP using WebPageTest or PageSpeed Insights to measure improvement.
| Image Setting | Before Optimization | After Optimization |
|---|---|---|
| Format/Size | PNG, 1.2MB, 2400x1800px | WebP, 180KB, 1200x800px |
| Load Attribute | loading=lazy | loading=auto |
| Responsive Toggle | Off | On |
Case Study: Webflow LCP Before/After Image Optimization
-
Before: SaaS homepage hero image (1.2MB PNG, lazy-loaded).
- LCP: 3.6s (PageSpeed Insights, mobile)
-
After: Same visual, exported as 180KB WebP, responsive set enabled,
loading=auto.- LCP: 1.7s (PageSpeed Insights, mobile)
Step 3: Minify and Defer JavaScript/CSS

Conceptual diagram: prioritize hero DOM order and defer non-critical JS/CSS to prevent render-blocking—visual guidance for structuring Webflow pages to improve LCP.
Heavy scripts and unused CSS are silent LCP killers for SaaS landing pages. That “one little script” for analytics or onboarding can triple your initial render time if loaded at the wrong moment.
Webflow LCP Optimization Techniques for Scripts
- Minify Assets: In Webflow Site Settings, enable “Minify CSS” and “Minify JS”. This strips whitespace, comments, and drastically reduces asset size.
- Defer Non-Critical Third-Party Scripts: For chat, tracking, or martech tools, use
deferor add to the<body> </body>custom code block (not<head>). - Remove Blockers from Above-the-Fold: Only preload the core CSS or main JavaScript. Everything else loads asynchronously.
How to Identify Render-Blocking Resources in Webflow
- Run a PageSpeed Insights or Lighthouse report.
- Look for warnings like “Eliminate render-blocking resources” and “Reduce unused JavaScript.”
- Open Chrome DevTools > Coverage tab. See CSS/JS coverage; remove or modify anything not used in the first paint.
Step 4: Prioritize Critical Content Loading
Your hero section is your first impression—don’t let the DOM hide it. Webflow lets SaaS teams design visually, but code structure matters for speed.
Key LCP Acceleration Tips for Above-the-Fold Content
- Move hero sections to the top of your DOM: In Webflow Designer, check that your visual hero matches the top node in Navigator. If not, reorder for efficiency.
- Relegate banners, sign-up forms, videos, and testimonials below the fold: Only the first visible image/text should be LCP.
- Use background images sparingly: Background image loads can be tricky for LCP. If your main hero is a background, consider switching to an inline image tag so that browsers prioritize its load.
Background Image “Trick” for Faster LCP
- Duplicate your hero image as a visually hidden
<img>tag before the background loads. This prompts browsers to prioritize its paint for LCP measurement while keeping design intact. - After the image loads, hide the inline
<img>with a CSS class. Users won’t see the duplicate, but LCP is measured much sooner.
Step 5: Lazy Load and CDN Usage
Lazy loading and fast global delivery reduces unnecessary load and delivers media only when needed.
Best Practices for Lazy Loading in Webflow
- Enable lazy loading (
loading="lazy") on all images and videos below the fold. - Skip lazy loading for hero/LCP content—let browsers prioritize what matters for UX and SEO.
- Use video thumbnails or compressed static backgrounds instead of loading large video files as LCP elements.
CDN Settings for Webflow Hosting
- Webflow uses a native CDN (Fastly, AWS Cloudfront) by default. Most SaaS sites do not need a custom CDN for LCP unless managing many high-traffic regions or custom domains.
- Custom CDN: If your enterprise SaaS has unique edge requirements, Cloudflare or Akamai can be layered for advanced control. Aim: Always serve critical assets from the edge closest to your user.
- Check CDN delivery: Use tools like KeyCDN Performance Test to confirm hero image and CSS are loaded from a CDN node nearest your user locations.
| Scenario | Native Webflow CDN | Custom CDN Layer |
|---|---|---|
| Most SaaS Landing Pages | Sufficient | Optional |
| Multi-region/Enterprise | Good, but limited routing control | Advanced routing, caching, purging |
- Webflow CDN, hero image (London): 320ms
- Webflow + Cloudflare, hero image (London): 180ms
- Webflow CDN, hero image (Sydney): 870ms
- Webflow + Cloudflare, hero image (Sydney): 530ms
Monitoring & Maintaining LCP Gains over Time
Webflow core web vitals optimization isn’t one-and-done—every asset, plugin, or campaign update can break your LCP. Protect your site speed investment with a sustainable process:
Best Practices for Ongoing LCP Monitoring
- Schedule monthly PageSpeed Insights audits for your top SaaS landing pages. Set calendar reminders to keep this routine.
- Use Webflow Audit Panel post-publish after any design/image update.
- Monitor LCP in Google Search Console’s Core Web Vitals reports. Set up alerts for any “Needs Improvement” or “Poor” URL status.
- Track mobile and desktop performance separately. SaaS sites often load more scripts via mobile onboarding flows.
Frequently Asked Questions
No. While Webflow’s native CDN and responsive images help, you must still compress images, structure your DOM for fast hero loading, and optimize third-party scripts. Ignoring these will put you in the yellow or red LCP zone every time.
Yes. Custom HTML or JavaScript injected in the <head> (without defer/async) or above-the-fold layout can block rendering, delaying LCP. Always defer third-party scripts and place them after main content unless absolutely critical.
Per Google: Good LCP = 2.5 seconds or less (mobile, 75th percentile). For competitive SaaS verticals, aim for <2 seconds to outperform organic rivals and maximize time on page.
- Monthly: For core marketing or conversion pages.
- Post-deploy: Any design, image, or critical content update.
- Quarterly: Full site-wide performance review.
- Compress images even further for mobile breakpoints (under 100KB if possible).
- Remove unnecessary scripts and assets for mobile using conditional loading.
- Test on real devices using Chrome DevTools (set to “Mid-tier Mobile”/3G) to reveal bottlenecks.
Actionable Takeaways and Conclusion
- Audit LCP using PageSpeed Insights and Chrome DevTools.
- Compress and resize above-the-fold images; convert to WebP/AVIF.
- Enable Webflow responsive images. Avoid lazy loading on hero/LCP assets.
- Minify all CSS and JS; defer non-critical scripts.
- Restructure your DOM so hero content loads first.
- Lazy load only below-the-fold media. Use native CDN (upgrade if global reach demands it).
- Schedule monthly LCP checks and track Core Web Vitals in Google Search Console.
For SaaS growth in 2025, LCP isn’t optional—it’s your competitive edge. Fast LCP means better SEO, happier trial users, and lower churn. Don’t let slow hero images or misplaced scripts sabotage your visibility and signups.
Embed these Webflow LCP optimization techniques into your marketing and product ops. Monitor, test, iterate—and watch your rankings and ROI accelerate with every page load.
Unlimited Design & Webflow Development
Get unlimited design & development requests for a flat monthly rate. Fast turnaround without compromising on quality. No contracts or surprises. Cancel anytime.