Setting Up Webflow Permissions & User Roles for Scaling Startups
Written by
Andy Dao
,CEO
Published on:
August 29, 2025
Why Webflow User Roles Matter for Scaling Startups
The biggest bottleneck for scaling startups isn't always traffic or product—it's workflow chaos. As companies grow, chaos appears in unexpected places: accidental website edits, sensitive content leaks, and misaligned site launches. Suddenly, an intern has the same site powers as your CTO, and your brand is one update away from disaster.
Webflow’s collaborative features offer powerful ways to solve these problems—but only if you set up user roles right. The right roles accelerate content velocity and keep your brand safe. The wrong setup leads to costly rework, launch delays, and security risks.
This guide gives you step-by-step, battle-tested tactics for how to set up permissions and user roles in Webflow for a scaling startup. You’ll see proven frameworks, actionable checklists, and advanced security tips—drawn from fast-growing SaaS teams—so your site moves as fast as your product.

Style: clean flat vector illustration with muted blues and gray, orange accent; minimal isometric elements, clear icons and labels — depicts chaos to order in roles
- Unlock teamwide productivity with the right role-mix
- Protect assets with ironclad permission setups
- Scale your Webflow workspace with confidence—even as your team doubles
Understanding Webflow User Roles & Permissions
Webflow supports several role types, each with unique permissions. Setting these up correctly is non-negotiable as your SaaS scales.
Overview: Webflow’s Core User Roles
- Admin: Full access. Can design, manage billing, invite/remove users, and control site settings.
- Editor: Can edit content (blog posts, collections), manage CMS items, but not site design or billing.
- Collaborator: (Legacy role, being replaced by Editors in new plans) Can add/edit content, limited to specific CMS permissions.
- Guest: View-only; cannot edit content or settings.
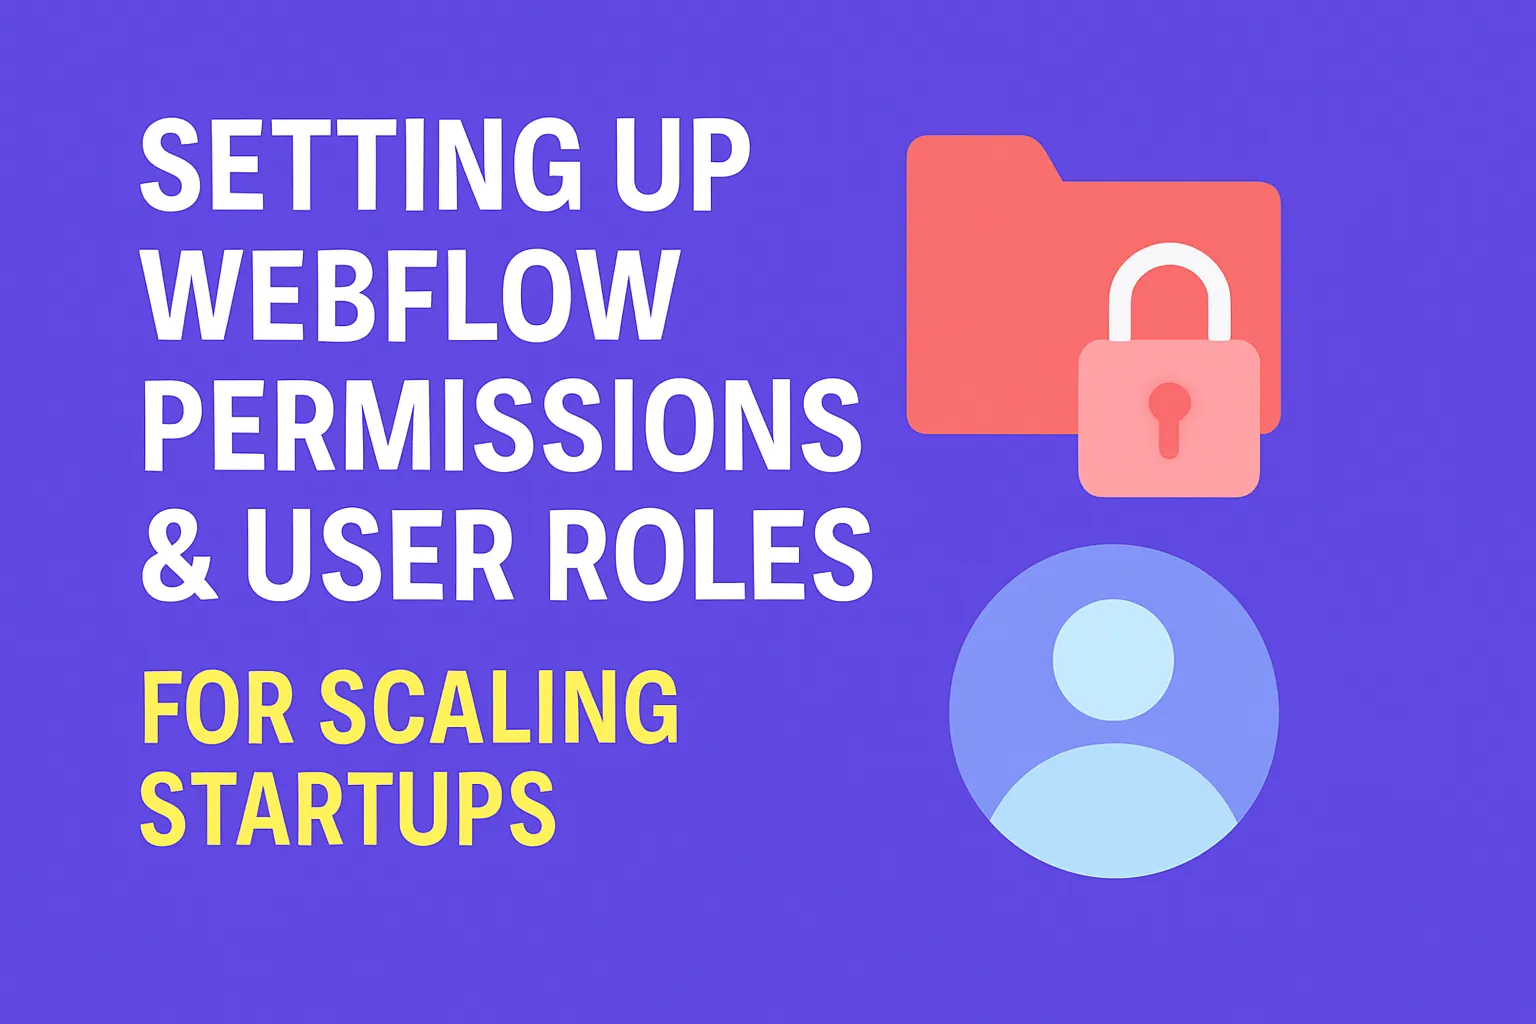
Role Comparison Table
| Permission | Admin | Editor | Collaborator | Guest |
|---|---|---|---|---|
| Edit Site Design | ✔️ | ❌ | ❌ | ❌ |
| Manage Content (CMS) | ✔️ | ✔️ | ✔️1 | ❌ |
| Handle Billing & Site Settings | ✔️ | ❌ | ❌ | ❌ |
| Invite/Remove Team Members | ✔️ | ❌ | ❌ | ❌ |
| Publish Changes | ✔️ | ✔️ (content only) | ✔️ (content only) | ❌ |
| View-Only | ✔️ | ✔️ | ✔️ | ✔️ |
Risks of Poor Role Assignment
Misconfigured roles are one of the top causes of SaaS site downtime and accidental data leaks. According to Webflow Enterprise, over 37% of security incidents in 2023 involved users with excessive permissions.
The fix: Map roles tightly to responsibilities, adopt a strict “least privilege” approach, and audit permissions monthly.
Mapping Your Startup’s Growth to Role Needs
As SaaS startups grow, so do their Webflow teams. What worked at ten people usually fails at fifty. Role design must evolve to avoid permissions sprawl and security holes.
Who Needs What? Practical Role Mapping
- Designers: Usually need Admin rights to iterate on layouts, prototypes, and visual experiments.
- Developers: Need Admin or advanced Editor mode to connect integrations, optimize performance, and manage hosting.
- Marketers & Copywriters: Editor access is ideal for publishing blog posts, running campaigns, and optimizing SEO content.
- Content Managers: Editor; restrict to specific Collections when possible.
- Sales/Support: Guest (View-Only) unless updating FAQs or resources.
Example Scenarios
Scenario 1:Role Mapping Tips at Scale
- Never make everyone an Admin—least privilege wins.
- Use Editor roles for campaign contributors and external writers.
- Review assignments every time teams shift or when onboarding new hires.
Step-by-Step Guide: Setting Up Roles in Webflow
Here’s how to implement a secure, scalable Webflow multi-user setup—fast. Follow these steps to assign Webflow collaborator roles and keep permissions aligned as you grow.
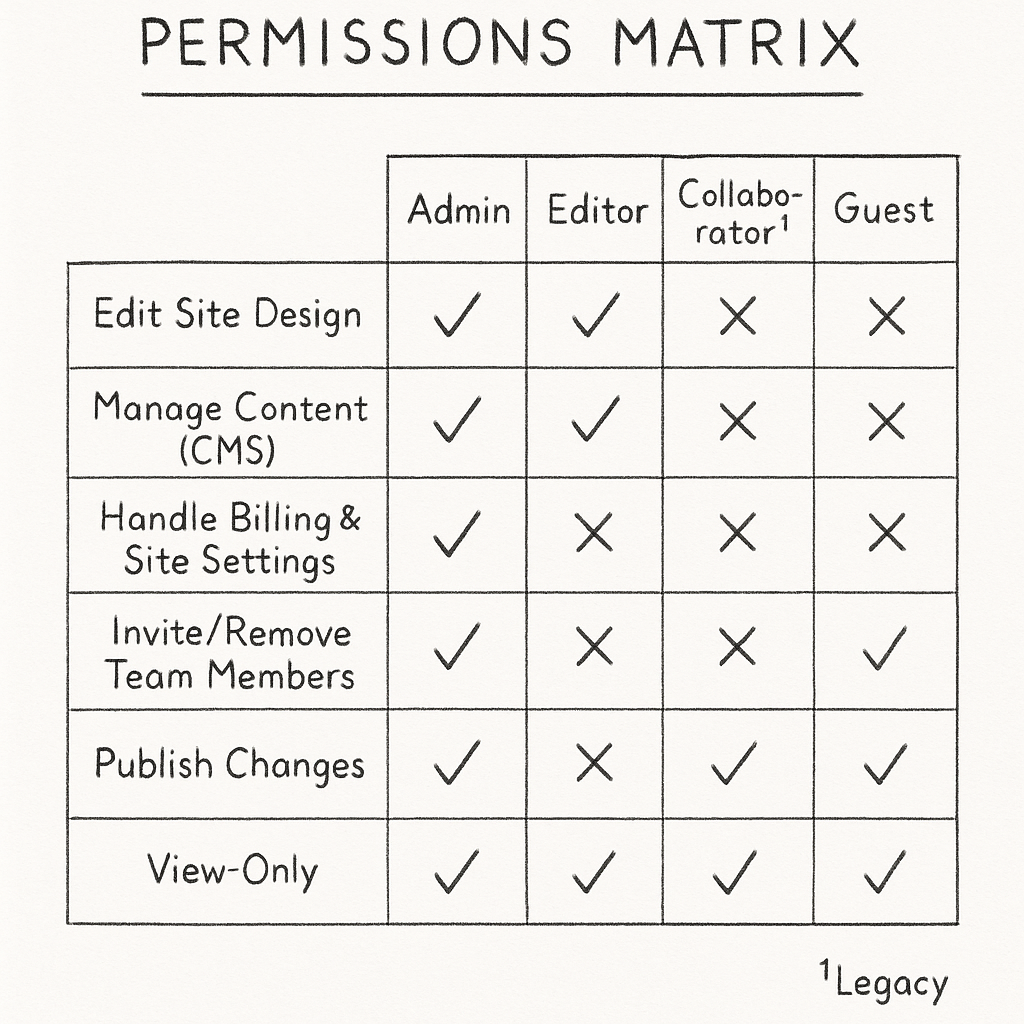
Step 1: Accessing Site Settings
- From the Webflow Dashboard, select your project.
- Click the Settings gear icon for that site.
- Navigate to the Members & Permissions tab.
Step 2: Inviting New Users
- In Members & Permissions, click Invite Members.
- Enter the team member’s email address.
- Select the Role from the dropdown (Admin, Editor, Guest).
- Customize permissions (if available per your plan).
- Press Send Invite. Webflow emails the invite.
- New users must accept via their email before accessing the site.
- You can track pending invites from this same screen.
Step 3: Assigning & Editing User Roles
- Find the user in the Members list.
- Click the Dropdown next to their current role.
- Select a new role (e.g., upgrade Editor to Admin).
- Changes take effect instantly and trigger an email notification.
Common Pitfalls & Troubleshooting
- Role Overlap: “Editor” and “Collaborator” are different roles. Use “Editor” for newer sites.
- Invite Errors: Make sure users are not already part of another Webflow Workspace with that email.
- Permission Not Sticking: Refresh the dashboard after saving changes for new role assignments to apply.
- Offboarding Misses: Removing users from your Webflow site does not remove them from your organization’s SSO provider (if connected). Always deprovision in both places.
| Step | What to Watch | Quick Fix |
|---|---|---|
| Invite User | Email not received | Check spam folder & correct address. Resend if needed. |
| Assign Role | User’s role not updating | Log out/back in; clear cache; verify permissions tab. |
| Remove User | Ghost access remains | Audit access via both Webflow and SSO dashboard. |
- Always double-check permissions before each new site launch.
- Rotate Admin roles periodically to maintain resilience in case of team turnover.
- Maintain a record of who has Admin/Editor powers in a shared doc or password manager.
Best Practices for Managing Webflow Permissions at Scale
Once your SaaS crosses 10+ users, ad hoc permissions start to break down. Scale means risk—and risk needs a process. Below are actionable strategies for secure Webflow workspace management.
Access Audits: Stay in Control
- Review Admin and Editor lists every 30 days
- Remove ex-employees and outside contractors immediately
- Verify access aligns with current team responsibilities
- Update permissions for role changes (promotion/demotion)
- Log all permission adjustments in a team-accessible changelog
Apply the “Least Privilege” Model
- Default to minimal access. Give users only the rights they need—nothing more, nothing less.
- Single-task accounts. For external vendors or short-term contractors, assign siloed Editor or Guest access only.
- Promptly downgrade roles when responsibilities change.
Streamlined Onboarding & Offboarding Workflows
- New Hire: Assign correct Webflow role during onboarding checklist. Notify Admin of start date.
-
Departing Employee:
- Revoke Webflow access on final day (both in Webflow and SSO/HR system).
- Update records in shared documentation (e.g., Notion, Google Doc).
| Event | Action | Owner |
|---|---|---|
| Onboarding | Assign role, share invite | Site Admin |
| Role Change | Edit user permissions in Webflow | Site Admin/Owner |
| Offboarding | Remove/deprovision access | Site Admin + HR |
Bottom line: Set calendar reminders for regular role reviews—and treat website access with the same rigor as app or infrastructure logins.
Integrations & Advanced Control: Beyond Webflow’s Native Roles
Webflow’s native roles cover 80% of use cases. For complex, multi-team SaaS setups, you may need deeper authentication, Single Sign-On (SSO), or third-party access control.
Using SSO for Centralized Access
- SAML SSO: Webflow Enterprise supports SAML 2.0 for sign-on with Okta, OneLogin, Azure AD, and others.
- SCIM provisioning: Automate user onboarding/offboarding directly from your identity provider (Enterprise feature).
- Benefits: Faster onboarding, instant access revokes, and compliance-grade audit trails.
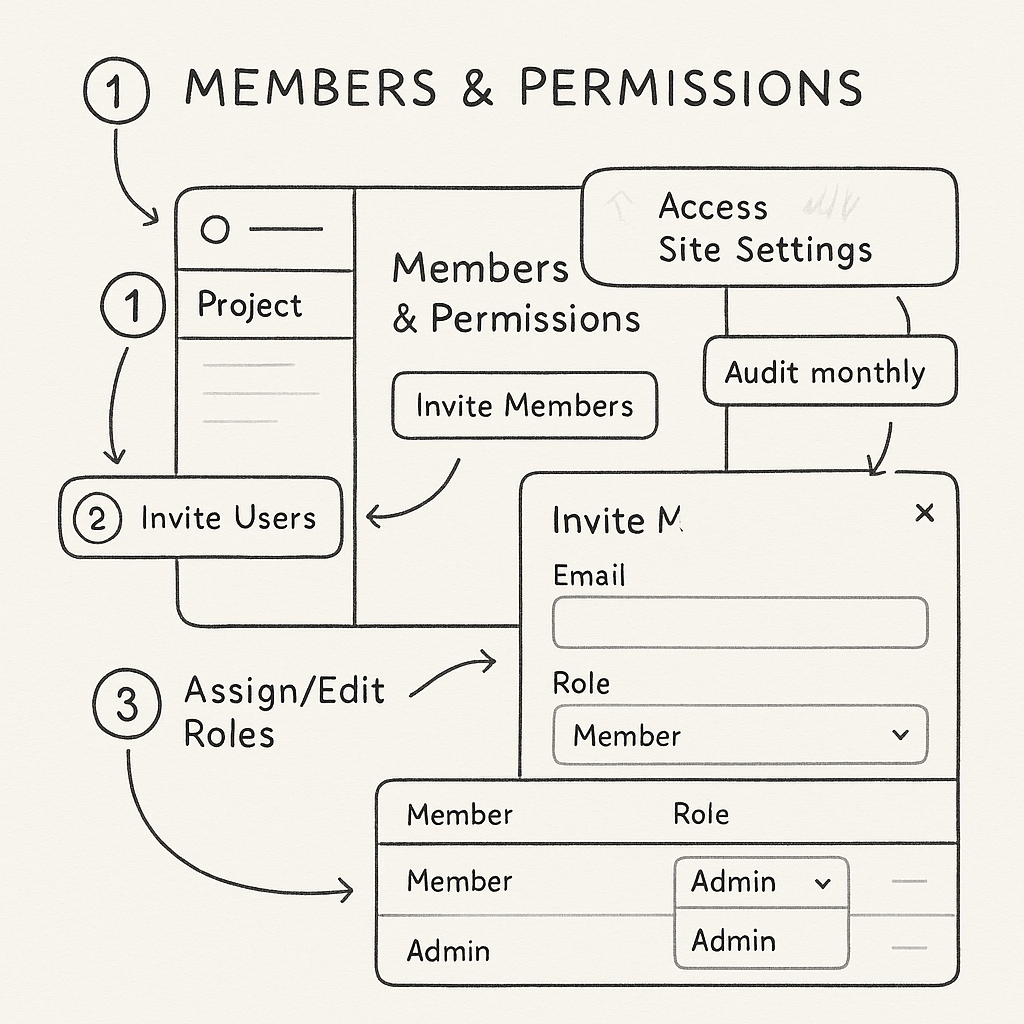
Case Study: Startup SAML SSO Implementation

labeled provider icons and arrows showing provisioning flow
Third-Party Tools for Granular Permissions
- Okta & OneLogin: Enterprise-grade IAM, rich with SSO + user provisioning.
- Zapier & Make (ex-Integromat): Workflow tools to sync permission updates across systems.
- Segment: For tracking and reporting web activity post-login.
Pro tip: For multi-brand or multi-site SaaS, group sites into distinct Webflow workspaces and enable SSO for each group.
Monitoring & Reporting User Activity
Growing SaaS teams need transparency, not just security. Monitoring helps catch issues early and create a culture of accountability.
Enable Change Tracking
- Webflow Activity Logs: Enterprise plans provide user activity tracking—who changed what, when.
- Version History: All plans can review site version history in the Designer, letting Admins roll back mistaken changes.
- Workspace Audit: Keep a shared log of role assignments/changes using Notion or Google Docs as a supplement.
Tips for Accountability at Scale
- Schedule weekly reviews of site change logs during team standups.
- Assign an “Owner” to each published page or collection for clearer responsibility.
- Document all permission updates and site restores.
Frequently Asked Questions
How many users can I add in Webflow?
Workspace Starter and Explorer Plans (formerly Teams): Limit of 2 editors for Starter, up to 10 for Explorer.
Growth/Enterprise: 10+ editors, unlimited guests, and up to 100 seats for Enterprise.
For most SaaS use cases, the Explorer or Growth workspace is sufficient, but always check your current plan restrictions via your site dashboard.
What’s the difference between Editor and Collaborator?
- Editor: The current, standard content role. Edit all CMS content, manage collections, publish blog posts, handle SEO fields, with a clean UI.
- Collaborator: Legacy role from older plans. Limited to certain CMS edits, no site design access, and less granular control. New sites use Editor by default.
For new projects, always use the "Editor" role for content contributors.
Can I restrict access to specific pages or collections?
Granular access (e.g., “edit this page only”) is not natively supported in the main Webflow UI as of 2025.
- You can restrict collection-level access (e.g., Editors manage Blog but not Careers CMS), but not individual static pages.
- For tighter controls, use Enterprise features or third-party integrations (like SSO groups and custom logic via Zapier for workflow gating).
- For public page access control, consider Memberstack or Memberful.
Is there audit logging for user actions?
Yes, but it depends on your plan. Webflow’s Enterprise tier offers detailed user logging (who changed/published/removed what and when). For other plans, use manual tracking via workspace notes or external workflow tools.
How do I upgrade or downgrade user roles?
- Go to Members & Permissions in your site/workspace settings.
- Find the user in the list; click their current role dropdown.
- Select the new role (Admin, Editor, Guest).
- Confirmation email sent to the user; permissions take effect right away.
If someone leaves or changes roles, action this immediately for security.
Actionable Takeaways & Conclusion
- Set roles intentionally: Map user needs and responsibilities to Webflow’s roles—never oversubscribe Admin.
- Embrace least privilege: More access means more risk. Always grant the lowest level sufficient for each team member.
- Review access regularly: Bake audits into staff changes, product launches, and quarterly reviews.
- Leverage SSO & automated offboarding: If your startup is growing fast, tie site access to your core identity platform.
- Track and document: Use activity logs and shared checklists for total transparency and fast recovery when things go wrong.
As your SaaS scales, your Webflow site should enable—not block—growth. With secure Webflow workspace management and disciplined permissioning, you’ll protect your brand, prevent mistakes, and let your team ship faster. Start with these steps, keep auditing as you grow, and treat your site’s user roles with the same care as your codebase.
Unlimited Design & Webflow Development
Get unlimited design & development requests for a flat monthly rate. Fast turnaround without compromising on quality. No contracts or surprises. Cancel anytime.