Lazy Loading & Asset Optimization for Ultra-Fast SaaS Webflow Pages
Written by
Andy Dao
,CEO
Published on:
August 15, 2025
Why Page Speed Is Do-or-Die for SaaS
In SaaS, speed isn’t just a nice-to-have—it’s the line between growth and churn. A 1-second delay in page load drops conversions by 7% (Gomez). For SaaS, every second lost means fewer signups, frustrated users, and a ballooning churn rate. Slow onboarding? Users vanish. Laggy dashboards? Upgrade rates plummet.
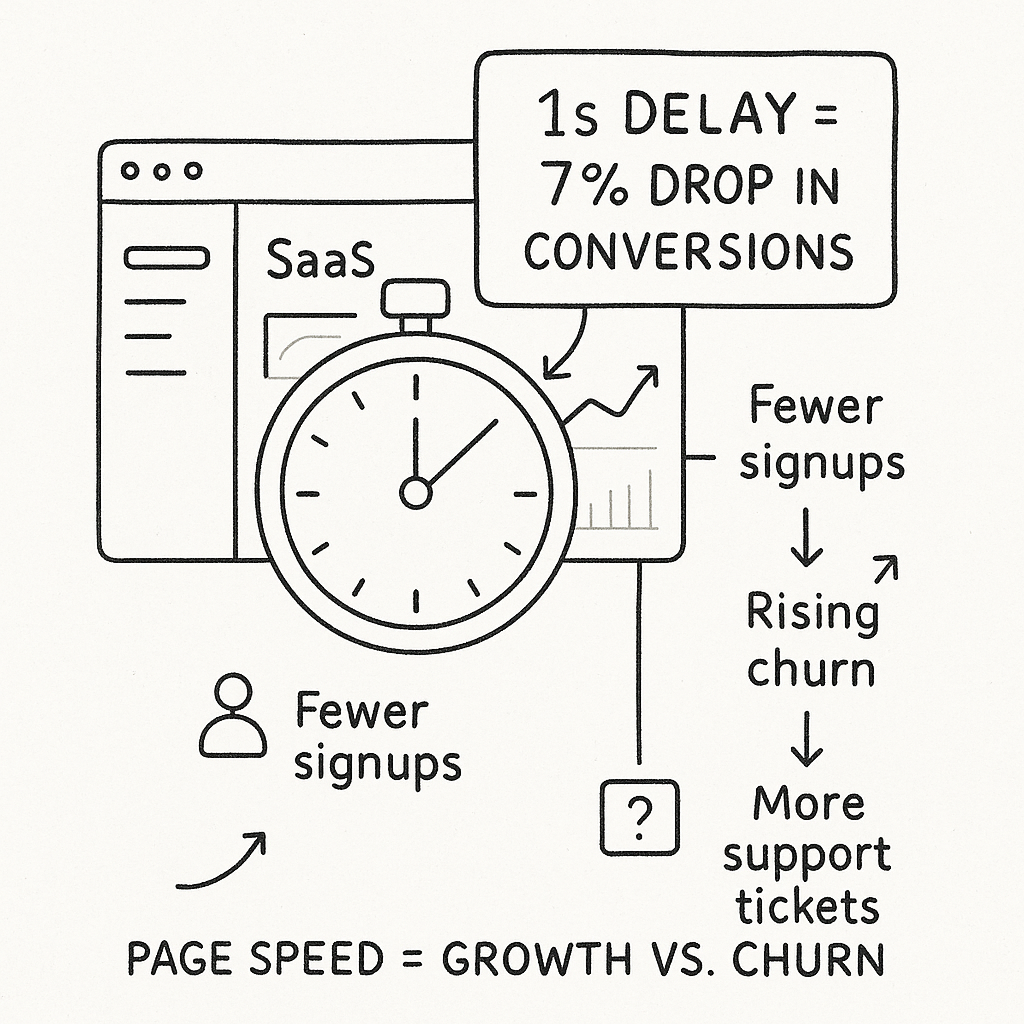
An at-a-glance visual of speed vs. growth. Style: modern flat vector illustration with muted blue/teal SaaS palette, simple icons, subtle gradients and isometric dashboard elements for a consistent brandable look.
Poor loading speed triggers a fatal cycle:
- Visitors abandon onboarding flows
- Google demotes your SEO ranking
- Support tickets surge as patience wears thin
If your Webflow SaaS site is sluggish, you’re bleeding ARR and growth velocity daily. That’s where lazy loading and asset optimization for SaaS Webflow pages changes the game.
What Is Lazy Loading?
Lazy loading is a performance technique that defers the loading of non-critical assets (like images, videos, and third-party scripts) until they’re about to enter the user’s viewport.
- Browser loads all assets on initial page load
- Slow TTFB (Time To First Byte)
- High bounce rate, low engagement
- Only above-the-fold content loads immediately
- Assets below the fold load as needed
- Faster first paint, smoother onboarding

Before vs after: how lazy loading prioritizes above-the-fold content. Style: same modern flat vector/isometric design as other visuals for visual consistency across the article.
Use cases for SaaS websites:
- Blog post images and diagrams
- Dashboard graphs and analytics embeds
- Product screenshots on landing pages
The result: streamlined user journeys and improving SaaS Webflow page load times—especially on high-content pages and split-test variants.
Core Benefits of Lazy Loading for SaaS Webflow Sites
1. Faster Load Times Drive Conversions
After lazy loading was deployed on a B2B SaaS client’s Webflow marketing site, homepage load times dropped from 5.3s to 1.7s (source: client analytics, 2024). The conversion rate on free trial signups increased by 14%.
2. Improved Core Web Vitals = Better SEO & UX
- LCP (Largest Contentful Paint): Lazy loading reduces LCP times by only loading what’s visible first.
- CLS (Cumulative Layout Shift): Images reserve space with the
widthandheightattributes, minimizing layout jumps.
| Metric | Before | After (Lazy Loading) |
|---|---|---|
| LCP | 3.5s | 1.9s |
| CLS | 0.22 | 0.05 |
| FCP | 2.6s | 1.2s |

Visualized Lighthouse improvements after lazy loading. Style: clean flat data viz using the article's muted blue/teal palette, clear labels and accessible color contrast.
3. Mobile Performance & User Retention
Lazy loading is a top driver of mobile SaaS retention. Most mobile users drop off when load times exceed 3 seconds. Lazy loading prioritizes above-the-fold CTAs and value props, maximizing activation in those critical first seconds.
Step-by-Step: Implementing Lazy Loading in Webflow
1. Use Webflow’s Native Lazy Loading Settings
-
Images: Select an Image element, click Settings (gear icon), and set Lazy Load to “On”.
Pro tip: Always set explicit width and height for better CLS scores. - Background Images: Webflow doesn’t natively lazy load background images. Consider swapping them for img tags when possible.
- All non-critical images: Lazy Load “On”
- Above-the-fold hero images: Lazy Load “Off”
- Logos/icons in nav bar: Lazy Load “Off”
- Blog post body images: Lazy Load “On”
2. Lazy Loading Scripts, Videos, and Embeds
For scripts or third-party embeds, use JavaScript to delay loading until the element scrolls into view.
<script>
  document.addEventListener('DOMContentLoaded', function() {
    const lazyEmbeds = document.querySelectorAll('iframe[data-src]');
    function loadEmbed(embed) {
      embed.src = embed.dataset.src;
      embed.removeAttribute('data-src');
    }
    const observer = new IntersectionObserver((entries) => {
      entries.forEach(entry => {
        if (entry.isIntersecting) {
          loadEmbed(entry.target);
        }
      });
    });
    lazyEmbeds.forEach(embed => observer.observe(embed));
  });
</script>
-
How to use: Set your iframe’s
srcasdata-srcinstead, e.g.<iframe data-src="..."></iframe>
3. Testing Your Implementation
- Lighthouse: Run a Lighthouse report. Check LCP, FCP, and total requests before and after.
- WebPageTest: Use WebPageTest to visualize resource waterfall, ensuring lazy-loaded assets only request after scroll-in.
- Chrome DevTools: Go to Network tab > Throttle to “Slow 3G” > Observe image loading patterns.
- Turn on Lazy Load for all non-essential images in Webflow
- Use IntersectionObserver for custom scripts and embeds
- Test with Lighthouse, WebPageTest, and DevTools throttle
Asset Optimization Fundamentals
1. Compress and Optimize Images
- Webflow built-in: Webflow automatically compresses uploaded images. Still, always optimize before upload.
- TinyPNG or TinyJPG: Run every image through TinyPNG or TinyJPG for max compression without visible quality loss.
2. Minify JavaScript and CSS
- Enable Webflow’s built-in minification in Project Settings > Hosting > Advanced Publishing Options.
- Custom code: Minify your custom scripts before pasting into the Webflow Head or Before </body> fields (use JavaScript Minifier).
3. Use SVGs and Optimize Fonts
- Replace PNG/JPG icons and graphics with SVGs for tiny file sizes and crisp scaling.
- Limit web fonts to only the weights/styles you use. Avoid loading entire font families if not needed.
| Asset Type | Optimization Method |
|---|---|
| Hero images | Compress (TinyPNG), set as background, lazy load “Off” |
| Blog images | Compress, lazy load “On” |
| Icons | SVG, inlined if possible |
| Fonts | Subset, only necessary weights/styles |
| Scripts | Minify, load asynchronously, lazy load if not essential |
Advanced Techniques: Automation & Third-Party Tools
1. CDN Integration for Global Speed
- Cloudflare: Point your domain’s DNS to Cloudflare. Use Automatic Platform Optimization for instant asset caching and WebP image conversion.
- Imgix/Cloudinary: Integrate with assets on external CDNs (read Imgix’s Webflow integration guide). These tools auto-compress, resize, and serve images in modern formats.
2. Automation Workflows (No-Code)
- Zapier/Integromat: Connect form submissions, newsletter signups, or asset uploads to automated image optimization flows (Integromat + Webflow).
- Example: Automatically optimize and re-upload marketing screenshots to your CDN before they hit the Webflow CMS.
- Removes human error from optimization chains
- Makes Webflow speed optimization for SaaS part of your publishing process
- Syncs image and script best practices for every stakeholder—not just devs
Monitoring & Measuring Real-World Performance
1. Tracking Key Metrics
- LCP (Largest Contentful Paint): Time to load hero image/heading. Target: <2.5s
- FID (First Input Delay): Tracks app interactivity delays. Target: <100ms
- CLS (Cumulative Layout Shift): Measures visual stability. Target: <0.1
- Google Search Console: See Core Web Vitals across all pages (Enhancements > Core Web Vitals)
- Google Analytics: Use Site Speed reports to measure time-to-interactive and bounce rates
- Webflow Audit Panel: Preview performance warnings during pre-publish
2. Interpreting Results
| Metric | Before Optimization | After Optimization |
|---|---|---|
| LCP | 3.6s | 1.8s |
| CLS | 0.18 | 0.03 |
| Bounce Rate | 62% | 48% |
- If LCP is high, check large hero/above-the-fold images
- If CLS jumps, add explicit
width/heighton all images - If FID spikes, audit for heavy JS bundles
Quick Wins & Common Mistakes to Avoid
- Lazy load only offscreen images—not above-the-fold CTAs or critical onboarding graphics
- Pre-compress all images before Webflow upload
- Use SVG for all custom icons and logos
- Periodically run Lighthouse audits (especially after redesigns or new feature launches)
- Applying lazy loading to header/nav images (hurts first paint and brand trust)
- Loading too many JS libraries, which spikes TTFB and FID—strip unused plugins
- Not setting
widthandheightfor images—causes layout shifts (bad CLS) - Overlooking background images: Webflow doesn’t lazy load these by default—consider alternatives
Lazy loading and asset optimization for SaaS Webflow pages works best when you combine best practices, relentless testing, and automation.
FAQ: Lazy Loading & Asset Optimization for SaaS
What assets should always load immediately?
- Above-the-fold/hero images – Your primary visual and CTA
- Logos, nav bar icons – For seamless brand trust and navigation
- Critical onboarding/tutorial graphics – Anything a user sees before scrolling
Does lazy loading hurt SEO in Webflow?
No—when implemented correctly, lazy loading helps SEO by boosting Core Web Vitals, which are confirmed Google ranking factors. Search engines can crawl lazily loaded images as long as they’re properly in the DOM. Avoid lazy loading critical content or images that represent text/semantic meaning required by bots.
How often should you audit asset performance?
- After every redesign or new feature launch
- Quarterly, as part of technical SEO audits
- Whenever you notice dips in signups, engagement, or Google Core Web Vitals scores
Can lazy loading break my SaaS site?
It can—if you’re not careful. Don’t lazy load vital assets (hero images, nav icons, content needed for interactivity). Always test onboarding flows and core UX flows after adding lazy loading especially if using custom code for embeds and third-party scripts.
Best tools/plugins for lazy loading and automation?
- Webflow’s built-in lazy load toggle for images (no code required)
- Cloudflare for global CDN and image optimization
- Imgix or Cloudinary for advanced image compression and transformation
- Zapier/Integromat for connecting asset workflows (auto-optimize before CMS upload)
- Lighthouse and WebPageTest for ongoing audit/reporting
Actionable Takeaways & Conclusion

Quick wins checklist for immediate impact. Style: consistent modern flat vector checklist cards/icons matching the article visuals for unified UX.
- Audit your SaaS Webflow site speed (Lighthouse, WebPageTest, Search Console)
- Turn on lazy loading for all non-essential, offscreen images in Webflow
- Pre-compress and optimize images before upload (use TinyPNG)
- Minify JavaScript and CSS (use Webflow settings &/or third-party tools)
- Integrate a CDN (Cloudflare, Imgix) for asset delivery and real-time optimization
- Monitor Core Web Vitals with regular audits and adjust as your SaaS evolves
If you’re managing a SaaS marketing or onboarding site in Webflow, start with these steps today. The fastest SaaS sites retain more users, rank higher on Google, and convert better—giving you a fundamental edge in a hyper-competitive space.
Don’t wait for Google or your users to tell you your site is slow. Set a quarterly Webflow site audit schedule, implement lazy loading and asset optimization, and make performance your unfair advantage.
Unlimited Design & Webflow Development
Get unlimited design & development requests for a flat monthly rate. Fast turnaround without compromising on quality. No contracts or surprises. Cancel anytime.